
Vegetable Burritos: A Symphony of Fresh Flavors
How to Craft Versatile, Vibrant Burritos
I’ve long believed that burritos are one of the world’s most versatile and satisfying foods. Whether you crave something light and wholesome or rich and decadent, burritos can be shaped to fit your mood, pantry, and palate. For me, their magic lies in the endless combinations of ingredients you can tuck inside a warm tortilla, each bit of a new adventure.
Today, I want to share how I make my go-to vegetable burritos. This particular version is close to my heart: the fillings are colorful, nutritious, and deeply flavorful. But more than that, they showcase the adaptability of burritos. If you have a tortilla and imagination, you have a burrito.


The Versatility of Vegetable Burritos
Burritos invite creativity. You can fill them with anything from simple beans and rice to roasted vegetables, tangy sauces, or even last night’s leftovers. They make an ideal vehicle for clearing out the fridge or for highlighting the freshest produce from the market. And, of course, burritos are perfect for sharing or for meal preparation ahead of a busy week.
My Vegetable Burrito Stuffing: A Closer Look
Let me walk you through my stuffing choices and why each plays a starring role:
- Sautéed Diced Potatoes: These add a toothsome bite and a hearty, comforting base. Potatoes soak up seasonings and offer substance, making the burrito satisfying and filling.
- Sauté a mix of Red Onions, Green and Red Peppers, and Corn: The olive oil lends richness and brings out the sweetness of the vegetables. Red onions provide subtle sharpness, green and red peppers add crunch and color, while corn contributes bursts of sweetness and a summery feel. I add black pepper, salt and a dash of
- Shredded Cheese: A blanket of cheese ties all the components together. When the burrito is warm, the cheese melts into the fillings, adding creaminess and depth.
- Chopped Spring Onions and Cilantro (Garnish): These fresh herbs provide a vivid contrast to the fillings, adding brightness, a hint of spice, and a pop of green.
- Lemon Juice: A generous squeeze over the assembled burrito wakes up all the flavors. The acidity cuts through the richness and unifies each bite.
Assembling Vegetable Burritos
Here’s my step-by-step process:
- Prep the Ingredients: I start by dicing potatoes into small cubes. I also dice red onions, green and red peppers, chop spring onions and cilantro.
- Cook the Potatoes: In a skillet over medium heat, Add a glug of olive oil and sauté the diced potatoes until golden brown and fork-tender. I season them with salt, pepper, and sometimes a sprinkle of smoked paprika.
- Sauté the Vegetables: Once the potatoes are done, I set them aside and use the same pan to sauté the red onions, peppers, and corn in olive oil. Cook until everything is tender yet still vibrant, seasoning as I go.
- Assemble the Burritos: I warm large flour tortillas in a dry skillet or microwave. Then, I layer in a scoop of potatoes, a heap of stir-fried vegetables, and a generous handful of shredded cheese.
- Finish and Garnish: With all the fillings inside, I fold the tortilla into a neat parcel. Just before serving, I scatter chopped spring onions and cilantro on top, then drizzle everything with fresh lemon juice.
Burritos as a Canvas
Burritos, to me, are a canvas—each ingredient, a stroke of flavor and color. This recipe can be adapted endlessly: swap in sweet potatoes, add black beans, stir in your favorite hot sauce, or try a crumble of feta for a twist. The point is to make it yours.
Delicious Vegetable Burritos: A Step-by-Step Guide

Easy Veggie Wraps
Today, I want to share with you one of my convenient go-to recipes for a quick, healthy, and delicious meal: veggie wraps. These wraps are perfect for lunch, dinner, or even a snack. They are incredibly versatile, allowing you to use whatever vegetables you have on hand. Plus, they are super easy to make!


Ingredients Insight
Let’s talk about some of the key ingredients that make these veggie wraps so delightful:
- Tortillas: I prefer using whole wheat tortillas for an extra boost of fiber, but you can use any type you like, including gluten-free options.
- Butter: Not only does butter add flavor but also prevents the wrap from getting too soggy due to the veggies and salt
- Fresh Vegetables: The star of the show! I love using a mix of colorful veggies like tomatoes, onions, carrots, and Arugula leaves. They add crunch, flavor, and a variety of nutrients.
- Avocado: Adding avocado gives the wraps a creamy texture and a dose of healthy fats.
- Cheese: I use torn cheese slices, such as Pepper Jack, can add a nice spicy flavor. Feel free to skip it if you want to keep the wraps vegan.
- Spices: a sprinkle of salt and pepper is a must and can elevate the flavors.
Steps to Make Veggie Wraps
Now, let’s get into the steps to make these delicious wraps:
- Prepare the Vegetables: Start by washing and slicing your vegetables into thin strips. This makes them easier to wrap and eat.
- Spread the butter: Take a tortilla and spread a layer of softened butter over it. This will act as the base and help hold the veggies in place and prevent the tortilla from getting too soggy.
- Layer the Veggies: Arrange your sliced vegetables on top of the butter. Be sure to distribute them evenly so you get a bit of everything in each bite.
- Add Avocado and Cheese: Place slices of avocado and cheese over the veggies.
- Season and Roll: Add a pinch of salt and pepper, carefully roll the tortilla tightly to enclose the filling.
Slice and Serve: Cut the wrap in half or into smaller pieces if you prefer. Serve immediately and enjoy!

Hi, I’m Anu — a home cook, recipe explorer, and travel enthusiast based in suburban Chicago. I started this blog to honor the home chefs who filled my childhood with love and flavor.
Every recipe here is personally tried, tasted, and tweaked in my kitchen—with stories, memories, and a dash of heart in every bite.
Categories
Breakfast
Salad
Soup
Dinner
Dessert
Vegeterian
Latest In Categories
Easy Veggie Wraps
Today, I want to share with you one of my convenient go-to recipes for a quick, healthy, and delicious meal: veggie wraps. These wraps are perfect for lunch, dinner, or even a snack. They are incredibly versatile, allowing you to use whatever vegetables you have on hand. Plus, they are super easy to make!
Ingredients Insight
Let’s talk about some of the key ingredients that make these veggie wraps so delightful:
- Tortillas: I prefer using whole wheat tortillas for an extra boost of fiber, but you can use any type you like, including gluten-free options.
- Butter: Not only does butter add flavor but also prevents the wrap from getting too soggy due to the veggies and salt
- Fresh Vegetables: The star of the show! I love using a mix of colorful veggies like tomatoes, onions, carrots, and Arugula leaves. They add crunch, flavor, and a variety of nutrients.
- Avocado: Adding avocado gives the wraps a creamy texture and a dose of healthy fats.
- Cheese: I use torn cheese slices, such as Pepper Jack, can add a nice spicy flavor. Feel free to skip it if you want to keep the wraps vegan.
- Spices: a sprinkle of salt and pepper is a must and can elevate the flavors.
Steps to Make Veggie Wraps
Now, let’s get into the steps to make these delicious wraps:
- Prepare the Vegetables: Start by washing and slicing your vegetables into thin strips. This makes them easier to wrap and eat.
- Spread the butter: Take a tortilla and spread a layer of softened butter over it. This will act as the base and help hold the veggies in place and prevent the tortilla from getting too soggy.
- Layer the Veggies: Arrange your sliced vegetables on top of the butter. Be sure to distribute them evenly so you get a bit of everything in each bite.
- Add Avocado and Cheese: Place slices of avocado and cheese over the veggies.
- Season and Roll: Add a pinch of salt and pepper, carefully roll the tortilla tightly to enclose the filling.
Slice and Serve: Cut the wrap in half or into smaller pieces if you prefer. Serve immediately and enjoy!

Chickpeas and Red Beet Salad
This recipe is inspired from Middle Eastern salads that use boiled Chickpeas as a main ingredient for the salad. The combination of colors, flavors and textures in this dish is simply irresistible.
Why these Ingredients
- Red Beets: These earthy and sweet root vegetables not only add a beautiful color to the salad but are also packed with essential nutrients like fiber, folate, and vitamin C. I used the ready boiled ones from Costco
- Boiled Garbanzo Beans (Chickpeas): Chickpeas are a fantastic source of protein and fiber. They have a nutty flavor and a firm texture that complements the softness of the beets. I cooked mine in the Instant pot, but you could use canned ones without compromising the taste too much
- Olive Oil: Used for sautéing, olive oil adds a rich, fruity flavor to the salad. It’s also known for its heart-healthy monounsaturated fats.
- Bay Leaf: This aromatic leaf is used to infuse the chickpeas with a subtle, herbal flavor during the cooking process.
- Shredded Coconut: Adding shredded fresh coconut gives the salad a hint of sweetness and a delightful texture.
- Red Onion: Red onions provide a sharp, tangy flavor that balances the sweetness of the beets and coconut.
- Cilantro: Fresh cilantro is used as a garnish, adding a burst of freshness and a hint of citrusy flavor.
- Lemon Juice: A squeeze of lemon juice at the end brightens up the salad and adds a zesty finish.


Steps to Prepare the Salad
- Cook the Chickpeas: Soak the Chickpeas overnight and boil or use Instant pot to cook the chickpeas until they are tender. This usually takes about 45 minutes to an hour in a regular pot. Once cooked, drain and set them aside.
- Prepare the Beets: While the chickpeas are cooking, peel and dice the red beets. Boil them until they are tender, which should take about 30 minutes. Drain and set aside.
- Sauté the Ingredients: In a large pan, heat some olive oil over medium heat. Add bay leaf and sauté.
- Add Shredded Coconut: Sprinkle the shredded coconut over the mixture and stir well to combine. Add some more on top. You can find it in the frozen section of most grocery stores
- Season and Garnish: Garnish with Red Onion slices, fresh cilantro and a generous squeeze of lemon juice.

A Delightful Yogurt Fruit Dip for a Summery Treat
As the summer sun shines brightly, there’s nothing quite like a refreshing and delicious yogurt fruit dip to accompany your favorite fruits. I have been enjoying this recipe for years, so it is time to share it. This delightful fruit dip is made with hung yogurt, cardamom powder, grated nutmeg, saffron, and brown sugar. This dip is not only easy to make but also packed with flavors that will elevate your fruit platter to a whole new level.

Hung Yogurt: Hung yogurt is simply yogurt that has been strained to remove its whey, resulting in a thicker and creamier texture. It’s a fantastic base for dips as it holds its shape and has a rich, tangy flavor.
Cardamom Powder: Cardamom is a spice that adds a warm, aromatic flavor to the dip. You can add a few whole seeds too for and intense crunchy bite.
Grated Nutmeg: Nutmeg has a sweet and nutty flavor. A little goes a long way, so just a pinch will do.
Saffron: Saffron is known for its vibrant color and unique flavor. It adds a touch of luxury to the dip and gives it a beautiful golden hue.
Brown Sugar: Brown sugar adds some sweetness and a subtle molasses flavor that balances the tanginess of the yogurt and the warmth of the spices. Substitute with Honey if you want to avoid sugar.
🌟 Recipe Star: This yogurt fruit dip is my go-to for summer – luxuriously creamy, fragrant with saffron and cardamom, and the perfect partner for fresh, juicy fruits.
✈️ Travel Tip: In India, saffron is often sourced from Kashmir, renowned for producing some of the world’s finest. If you visit, bring home a small tin to recreate this dip with authentic flavor.
Trending now
Easy Veggie Wraps
Today, I want to share with you one of my convenient go-to recipes for a quick, healthy, and delicious meal: veggie wraps. These wraps are perfect for lunch, dinner, or even a snack. They are incredibly versatile, allowing you to use whatever vegetables you have on hand. Plus, they are super easy to make!
Ingredients Insight
Let’s talk about some of the key ingredients that make these veggie wraps so delightful:
- Tortillas: I prefer using whole wheat tortillas for an extra boost of fiber, but you can use any type you like, including gluten-free options.
- Butter: Not only does butter add flavor but also prevents the wrap from getting too soggy due to the veggies and salt
- Fresh Vegetables: The star of the show! I love using a mix of colorful veggies like tomatoes, onions, carrots, and Arugula leaves. They add crunch, flavor, and a variety of nutrients.
- Avocado: Adding avocado gives the wraps a creamy texture and a dose of healthy fats.
- Cheese: I use torn cheese slices, such as Pepper Jack, can add a nice spicy flavor. Feel free to skip it if you want to keep the wraps vegan.
- Spices: a sprinkle of salt and pepper is a must and can elevate the flavors.
Steps to Make Veggie Wraps
Now, let’s get into the steps to make these delicious wraps:
- Prepare the Vegetables: Start by washing and slicing your vegetables into thin strips. This makes them easier to wrap and eat.
- Spread the butter: Take a tortilla and spread a layer of softened butter over it. This will act as the base and help hold the veggies in place and prevent the tortilla from getting too soggy.
- Layer the Veggies: Arrange your sliced vegetables on top of the butter. Be sure to distribute them evenly so you get a bit of everything in each bite.
- Add Avocado and Cheese: Place slices of avocado and cheese over the veggies.
- Season and Roll: Add a pinch of salt and pepper, carefully roll the tortilla tightly to enclose the filling.
Slice and Serve: Cut the wrap in half or into smaller pieces if you prefer. Serve immediately and enjoy!
Chickpeas and Red Beet Salad
This recipe is inspired from Middle Eastern salads that use boiled Chickpeas as a main ingredient for the salad. The combination of colors, flavors and textures in this dish is simply irresistible.
Why these Ingredients
- Red Beets: These earthy and sweet root vegetables not only add a beautiful color to the salad but are also packed with essential nutrients like fiber, folate, and vitamin C. I used the ready boiled ones from Costco
- Boiled Garbanzo Beans (Chickpeas): Chickpeas are a fantastic source of protein and fiber. They have a nutty flavor and a firm texture that complements the softness of the beets. I cooked mine in the Instant pot, but you could use canned ones without compromising the taste too much
- Olive Oil: Used for sautéing, olive oil adds a rich, fruity flavor to the salad. It’s also known for its heart-healthy monounsaturated fats.
- Bay Leaf: This aromatic leaf is used to infuse the chickpeas with a subtle, herbal flavor during the cooking process.
- Shredded Coconut: Adding shredded fresh coconut gives the salad a hint of sweetness and a delightful texture.
- Red Onion: Red onions provide a sharp, tangy flavor that balances the sweetness of the beets and coconut.
- Cilantro: Fresh cilantro is used as a garnish, adding a burst of freshness and a hint of citrusy flavor.
- Lemon Juice: A squeeze of lemon juice at the end brightens up the salad and adds a zesty finish.
Steps to Prepare the Salad
- Cook the Chickpeas: Soak the Chickpeas overnight and boil or use Instant pot to cook the chickpeas until they are tender. This usually takes about 45 minutes to an hour in a regular pot. Once cooked, drain and set them aside.
- Prepare the Beets: While the chickpeas are cooking, peel and dice the red beets. Boil them until they are tender, which should take about 30 minutes. Drain and set aside.
- Sauté the Ingredients: In a large pan, heat some olive oil over medium heat. Add bay leaf and sauté.
- Add Shredded Coconut: Sprinkle the shredded coconut over the mixture and stir well to combine. Add some more on top. You can find it in the frozen section of most grocery stores
- Season and Garnish: Garnish with Red Onion slices, fresh cilantro and a generous squeeze of lemon juice.
A Delightful Yogurt Fruit Dip for a Summery Treat
As the summer sun shines brightly, there’s nothing quite like a refreshing and delicious yogurt fruit dip to accompany your favorite fruits. I have been enjoying this recipe for years, so it is time to share it. This delightful fruit dip is made with hung yogurt, cardamom powder, grated nutmeg, saffron, and brown sugar. This dip is not only easy to make but also packed with flavors that will elevate your fruit platter to a whole new level.
Hung Yogurt: Hung yogurt is simply yogurt that has been strained to remove its whey, resulting in a thicker and creamier texture. It’s a fantastic base for dips as it holds its shape and has a rich, tangy flavor.
Cardamom Powder: Cardamom is a spice that adds a warm, aromatic flavor to the dip. You can add a few whole seeds too for and intense crunchy bite.
Grated Nutmeg: Nutmeg has a sweet and nutty flavor. A little goes a long way, so just a pinch will do.
Saffron: Saffron is known for its vibrant color and unique flavor. It adds a touch of luxury to the dip and gives it a beautiful golden hue.
Brown Sugar: Brown sugar adds some sweetness and a subtle molasses flavor that balances the tanginess of the yogurt and the warmth of the spices. Substitute with Honey if you want to avoid sugar.
🌟 Recipe Star: This yogurt fruit dip is my go-to for summer – luxuriously creamy, fragrant with saffron and cardamom, and the perfect partner for fresh, juicy fruits.
✈️ Travel Tip: In India, saffron is often sourced from Kashmir, renowned for producing some of the world’s finest. If you visit, bring home a small tin to recreate this dip with authentic flavor.
International Recipes

Mango Panna Cotta
A Sweet Treat to Celebrate Summer
Panna cotta is a no-bake, eggless dessert that is creamy, velvet smooth, and incredibly easy to make! This silky, custard-like dessert pairs well with fresh fruit, a compote of baked fruits, or even just a spoonful of fruit preserves or homemade jam. Using mango puree to make this elegant and delicious Italian recipe results in a throwback to a hot tropical summer vacation for your tastebuds. Enjoy a delightful serving of Mango Panna Cotta for a refreshing finish to your meal.
Ingredients:
- Milk (1 cup): Provides the creamy base for the panna cotta.
- Heavy Cream (1 1/4 cups): Adds richness and a velvety texture.
- Mango Puree (3/4 cup): Brings a tropical flavor and natural sweetness.
- White Sugar (1/4 cup): Sweetens the dessert.
- Powdered Unflavored Gelatin (3 tsp): Helps set the panna cotta.
- Vanilla (1 tsp, optional): Adds a hint of vanilla flavor.
- Cold Water (6 Tbsp): Used to dissolve the gelatin.
Steps:
- Heat the Mixture: Start by heating the milk, heavy cream, and sugar in a pot on medium heat. Once the sugar is dissolved, remove from heat and stir in the vanilla extract.
- Prepare the Gelatin: Lightly oil a mold (or cups) with a neutral-tasting vegetable oil. Sprinkle the gelatin over the cold water in a medium-sized bowl and let stand for 5 to 10 minutes.
- Combine and Mix: Pour the very warm panna cotta mixture over the gelatin and stir until the gelatin is completely dissolved. Mix in the mango puree.
- Chill: Pour the mixture into the mold and chill for 2 to 4 hours.
- Serve: To serve, run a sharp knife around the edge of the panna cotta and unmold onto a serving plate. Serve cold.
I hope you enjoy making and savoring these Baked This dessert is a favorite in my house, and I have served it with many different accompaniments including fresh mango pieces, salted caramel sauce, fruit compote, cherries and nectarines marinated in sweetened red wine, and even baked apricots. I hope you will enjoy Mango Panna Cotta with an accompaniment of your own!

🌟 Recipe Star: This Mango Panna Cotta is my ultimate summer dessert – creamy, fruity, and completely no-bake! Every spoonful feels like a mini tropical getaway.
✈️ Travel Tip: If you ever visit Italy, try a classic panna cotta in Piedmont, its birthplace. Then, recreate the magic back home with tropical twists like mango for a sunny, exotic touch.
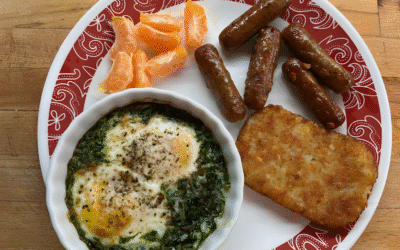
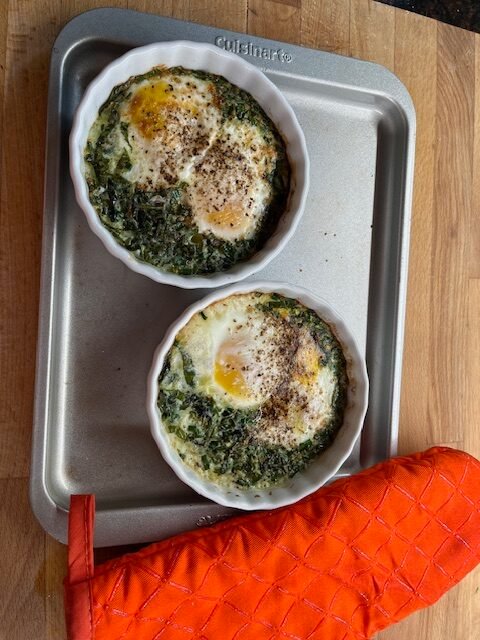
Baked Eggs with Herbs: A Delightful Breakfast Treat
Cooking is one of my favorite pastimes, and today, I want to share a delightful recipe for Baked Eggs with Herbs. This dish is not only delicious but also incredibly easy to prepare. It’s perfect for a lazy weekend breakfast or a quick weekday meal. Let me take you through the ingredients and steps involved in making this savory treat.
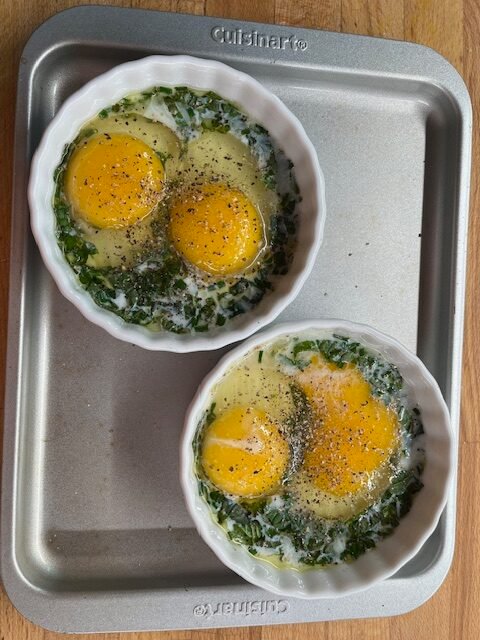
Ingredients Insight
- Eggs: The star of the dish, eggs are a versatile ingredient packed with protein and essential nutrients. They provide a creamy texture and rich flavor when baked.
- Butter: Eggs cooked in butter taste so much better, add a little bit of olive oil to avoid smoking the butter in the broil
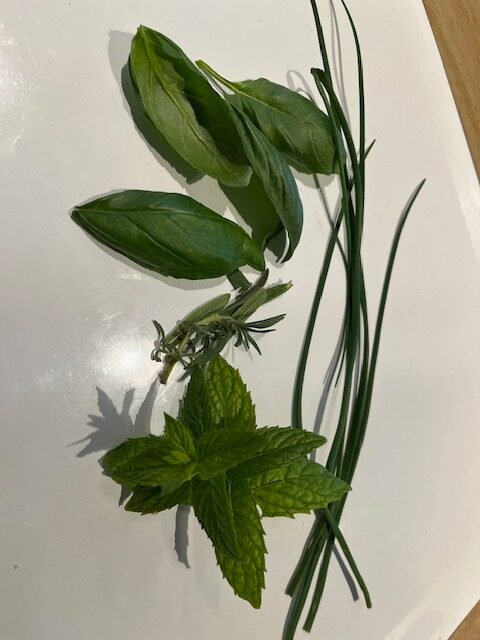
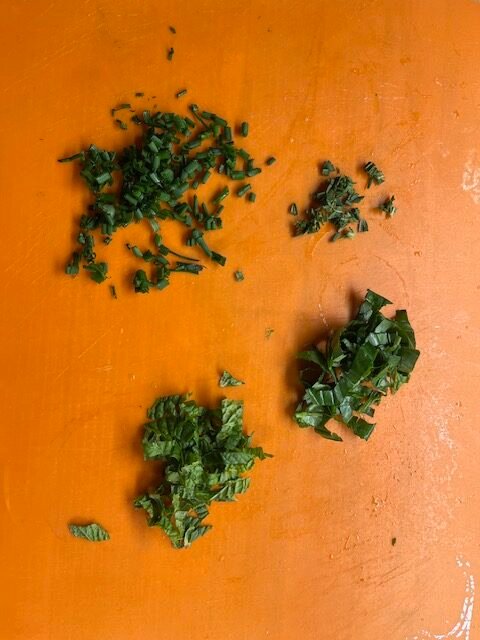
- Herbs: Fresh herbs like parsley, chives, rosemary, and thyme add a burst of flavor and aroma. They elevate the dish and give it a fresh, vibrant taste.
- Cream: A splash of heavy cream adds richness and a velvety texture to the eggs. It helps to keep the eggs moist and tender as they bake.
- Cheese: A sprinkle of grated cheese, such as Parmesan or Gruyère, adds a savory depth and a golden, bubbly top.
- Salt and Pepper: Simple seasonings that enhance the natural flavors of the ingredients.
Steps Involved
- Preheat the Oven: Start by preheating your oven to 375°F (190°C). This ensures that the eggs cook evenly and develop a nice, golden top.
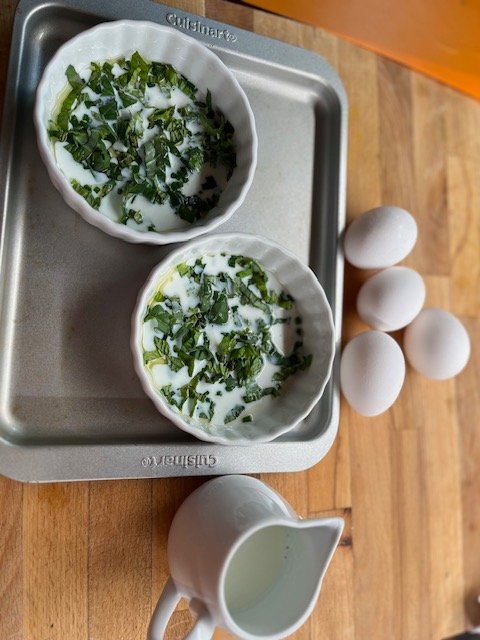
- Prepare the Ramekins: Lightly grease individual ramekins or a baking dish with butter or cooking spray. This prevents the eggs from sticking and makes for easy cleanup.
- Crack the Eggs: Carefully crack the eggs into the prepared ramekins. You can use one or two eggs per ramekin, depending on your preference.
- Add the Cream: Pour a tablespoon of heavy cream over each egg. This adds richness and helps to keep the eggs moist.
- Season and Add Herbs: Sprinkle the eggs with salt, pepper, and your choice of fresh herbs. Be generous with the herbs to infuse the eggs with their wonderful flavors.
- Top with Cheese: Add a sprinkle of grated cheese on top of the eggs. This will melt and create a delicious, golden crust.
- Bake: Place the ramekins in the preheated oven and bake for 12-15 minutes, or until the eggs are set to your liking. The whites should be firm, and the yolks should be slightly runny.
- Serve: Remove the ramekins from the oven and let them cool for a minute. Serve the baked eggs with a side of toast or a fresh salad for a complete meal.
I hope you enjoy making and savoring these Baked Eggs with Herbs as much as I do. Happy cooking
🌟 Recipe Star: Lorem ipsum – dolor sit amet, consectetur adipiscing elit. Curabitur vel sapien non nulla aliquet commodo vitae a nunc.

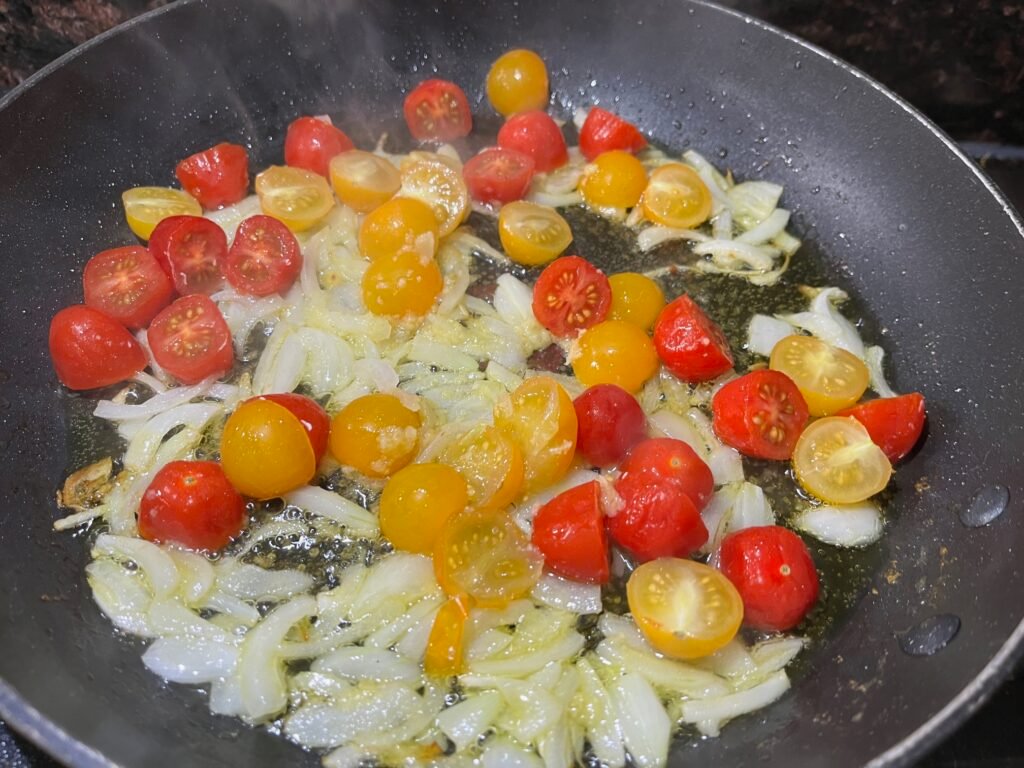
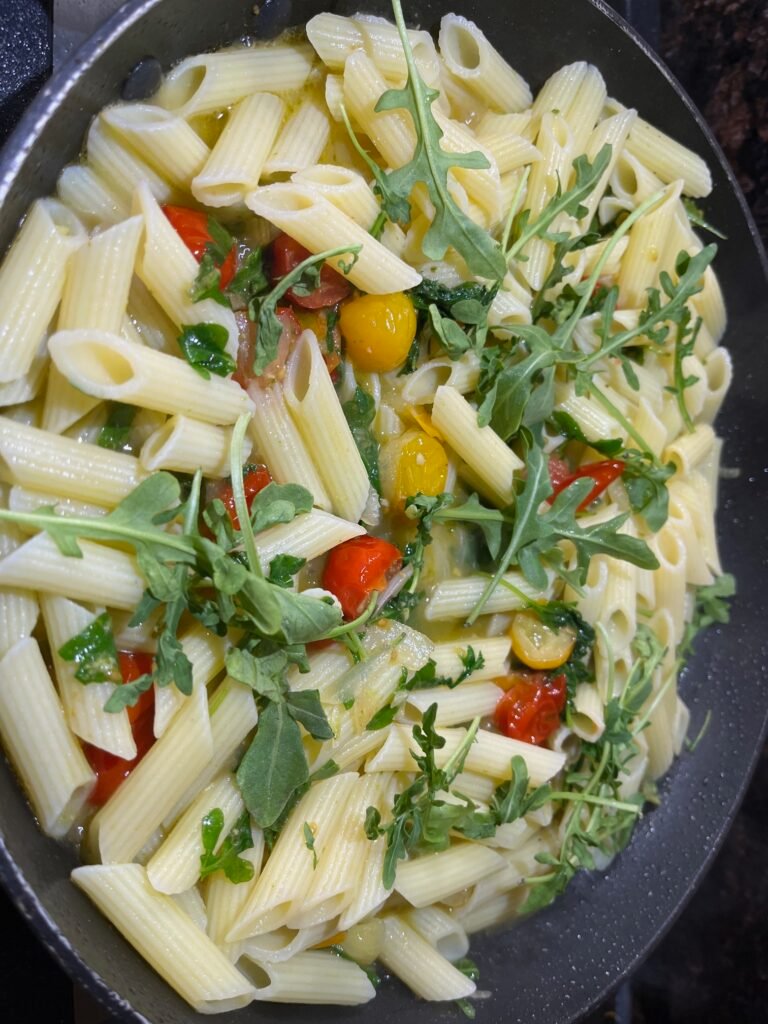
Cherry Tomatoes and Arugula Pasta
Cooking cherry tomatoes and arugula with penne pasta is a delightful and simple dish that brings together the freshness of cherry tomatoes, the peppery flavor of arugula, and the comforting texture of penne pasta. This dish is not only delicious but also quick to prepare, making it perfect for a weeknight dinner.

Ingredients
- Cherry Tomatoes: These small, round tomatoes are known for their sweet and juicy flavor. They add a burst of freshness and color to the dish.
- Arugula: Also known as rocket, arugula has a distinctive peppery taste that complements the sweetness of the cherry tomatoes. It is rich in vitamins A, C, and K.
- Penne Pasta: Penne is a type of pasta with cylinder-shaped pieces. It is perfect for holding onto sauces and ingredients, making each bite flavorful.
- Garlic: Adds a wonderful aroma and depth of flavor to the dish.
- Olive Oil: Used for sautéing the garlic and tomatoes, it adds a rich and smooth texture to the dish.
- Parmesan Cheese: Aged cheese that adds a salty and nutty flavor, enhancing the overall taste of the pasta.
Steps Involved
- Cook the Penne Pasta: Begin by boiling a pot of salted water. Add the penne pasta and cook according to the package instructions until al dente. Drain and set aside.
- Sauté the Garlic and Tomatoes: In a large skillet, heat olive oil over medium heat. Add minced garlic and sauté until fragrant. Add the cherry tomatoes and cook until they start to soften and burst.
- Combine Pasta and Arugula: Add the cooked penne pasta to the skillet with the tomatoes. Toss to combine. Add the arugula and cook for another 1-2 minutes until it wilts.
- Season and Serve: Season with salt and pepper to taste. Serve the pasta in bowls and top with freshly grated Parmesan cheese.
🌟 Recipe Star: Cherry tomatoes – juicy, sweet, and rich in antioxidants like lycopene for heart and skin health.
✈️ Travel Tip: From Puglia, Italy – famous for fresh, simple pastas and sun-ripened produce. A must-visit for tomato lovers!
How To, Tips & More
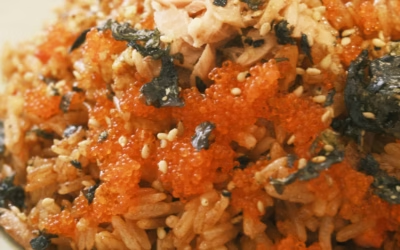
Cooking the Perfect Brown Rice
Unlocking Nutrition and Versatility in Your Kitchen
When I first began exploring healthier options in my everyday cooking, brown rice quickly became a staple in my pantry. Its nutritional value—packed with fiber, vitamins, and minerals—makes it a smart choice for anyone looking to enhance their meals without sacrificing taste or texture. In today’s modern kitchen, brown rice is more than just a side dish; it’s a foundation for nourishing, delicious recipes.
Why Brown Rice Deserves a Place in Your Pantry
Unlike white rice, brown rice retains its bran and germ, which means it offers more fiber and nutrients. This makes it beneficial for digestion, maintaining steady energy levels, and supporting heart health. For those striving to eat whole foods, brown rice is an easy swap that brings both substance and flavor to the table.
My Step-by-Step Guide to Perfect Brown Rice
Cooking brown rice can seem intimidating—it’s notorious for being tricky to get just right. Over the years, I’ve perfected a method that yields fluffy, tender grains every time. Here’s how I do it:
- Measure and Rinse: I start with one cup of brown rice, rinsing it under cold water until the water runs clear. This helps remove excess starch and prevents gumminess.
- Use the Right Water Ratio: Unlike white rice, brown rice needs more water. I use 2 1/2 cups of water for every cup of rice.
- Boil and Simmer: In a saucepan, I bring the water and rice to a boil, add a pinch of salt, then cover and reduce the heat to low. It’s important not to lift the lid—steam is crucial!
- Cook Time: I let the rice simmer for about 45 minutes. When the water is absorbed and the grains are tender, I remove it from the heat.
- Rest and Fluff: I let the rice sit, covered, for 10 minutes. This final step lets the steam finish the job. Then, I fluff with a fork to separate the grains.
- Alternatively if you have a rice cooker, you can use it and make it a lot easier and also save some time.
Tips for Enhancing Flavor
Sometimes, I like to infuse my rice with extra flavor by adding bay leaves, garlic, or a splash of olive oil to the water before cooking. Toasting the rice in the saucepan with a little oil before adding water also deepens its nutty taste.
Brown Rice: A Versatile Ingredient
Once you master cooking brown rice, the possibilities are endless. I use it as a base for grain bowls, stir-fries, salads, and even soups. It pairs beautifully with roasted vegetables, lean proteins, and flavorful sauces. Brown rice can be the star of a hearty pilaf, the backbone of a veggie-packed burrito, or a wholesome addition to homemade sushi rolls.
Learning how to cook the perfect brown rice has transformed my meals, making them healthier and more satisfying. I can enjoy it in countless recipes, knowing I’m making a nutritious choice every time. If you haven’t made brown rice a regular part of your cooking routine, now is the perfect time to start—your taste buds and your body will thank you!
